Homemade Granola Bars

Blog pics 2-26 001Blog pics 2-26 003

I have always loved granola bars. They are easy to throw in your purse or gym bag and are very satisfying. However, many packaged granola bars have tons of corn syrup and other additives in them, even when they claim to be natural.  Here is a quick, easy and yummy granola bar that you can make in your own home.  It is adapted from Ina Garten’s Homemade Granola Bar recipe. Garten’s  are very tasty, but a bit too sweet for my husband and me.  After playing around with the amount of brown sugar and honey, this is what I came up with:

Ingredients:

2 cups old fashioned oats (you can also use instant)

1/2 cup chopped pecans

1/4 cup shredded coconut

1/2 cup toasted wheat germ

3 TBSP butter (Don’t skimp on this amount.  I tried using less and they won’t stick together!)

1/3 cup honey

2 TBSP light brown sugar

1 1/2 tsp vanilla extract

pinch of salt

1/2 cup chopped dried cranberries

1/2 cup chopped dried apricots

1/2 cup chopped raisins or chocolate chips (optional)

Directions:

1. Preheat oven to 350.

2.  Toast the oatmeal, pecans and coconut about 6 minutes.  Stir and toast another 5-6 minutes.

3.  Put toasted mixture in a bowl and add the wheat germ. Mix well.

4.  Lower the temperature to 300.

5.  In a small saucepan, melt butter, brown sugar, vanilla and salt over low-medium heat.

6.  Once it starts to boil, let it go for one minute (no more, no less!)

7.  Pour over toasted mixture and combine.

8.  Add dried fruit and mix well.

9.  Spray a small rectangular baking dish with PAM or butter it.

10.  Line dish with parchment paper.

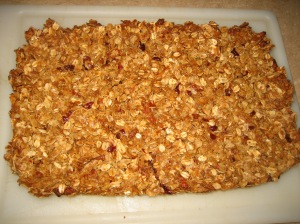
11.  Press granola mixture into the dish and bake for 20-25 minutes or until golden brown.

12.  Remove from oven and place on cooling rack for at least 2 hours.

13.  Remove from the dish (it will come right out off the parchment paper) and place onto cutting board.

14. Cut into bars and serve.

TIP #1 – Make sure that the dried fruits are cut to the same size and evenly distributed.

TIP #2 – Use the crumbs leftover from cutting the bars to put in your yogurt or over ice cream.  MMMMM!

Open-Faced Avocado and Egg

Egg and Avacado


Right now, I am obsessed with avocados. I remember hearing an interview with Kim Cattrall (Samantha from “Sex and the City”) on how she stays so youthful looking. She said that she eats 1/2 an avocado or salmon every day. Well, it’s worked for her and since I am about to approach the big 4-0, I thought I would try it for myself. So far, so good.  At least I don’t see any new wrinkles…

Anyway, according to http://www.webmd.com there are many reasons to include avocados in your diet.  Here are a few:

Avocado Nutrition

Avocados are a good source of fiber, potassium, and vitamins C,K, folate, and B6. Half an avocado has 160 calories, 15 grams of heart-healthy unsaturated fat, and only 2 grams saturated fat. One globe contains more than one-third daily value of vitamin C, and more than half the day’s requirements of vitamin K.  Recent research shows that antioxidants such as lycopene and beta-carotene are better absorbed with the healthy monounsaturated fat avocados have in abundance.

So, here is a very simple, delicious and semi-nutritious recipe for you to make for breakfast, lunch or even a snack. You do not have to fry and egg either. I have eaten it with a soft-boiled and poached egg. Speaking of the egg, that’s the only thing you have to cook!

Ingredients:

1/2 avocado

1 egg

salt

1 slice of bread

Directions:

1.  Toast the bread.

2. Fry egg or egg whites to your liking (I like the yolk a little soft.)

3.  While the egg is cooking, cut an avocado in half and remove the pit.

4.  Scoop out one half and mash it down on the toast (soooo much better and healthier than butter or cream cheese!)

5.  Sprinkle with salt (optional).

6. Top with fried egg.

Simply wonderful!

TIP – to avoid the other half from browning, you can do one of two things:

1. Eat it!

2. Sprinkle with a little lemon juice and wrap tightly in plastic wrap for later on or the next day.

Ham, Cheese and Jalapeno Hash Browns

HASH 2

My husband usually makes breakfast on Sunday mornings. He is a phenomenal cook and likes to use a lot of spice in his dishes.  He knows how to put in just enough heat to enjoy the flavor of the food, yet make your taste buds dance in your mouth.  And I don’t know what it is about spicy food, but once I start eating it, I want more. And more.  No matter how spicy it is!  This weekend, he made a Ham, Cheese and Jalapeno Hash Brown with a fried egg on top. It was incredible!

You can easily up or down the heat in this dish.  You can add more or less chili powder and cayenne or omit them all together if you only like a little bit of heat.  Also, for years, we would peel fresh potatoes and slice them on a cutting board or mandarin.  But then, one day, I found my new favorite pantry staple.  Frozen shredded hash browns!  They are cheap, easy and pretty much a blank palette so you can season them however you want.  In fact, I am going to give you two recipes today. One for basic hash browns for those who don’t like heat and one for the Ham, Cheese and Jalapeno Hash Browns.  Here we go!

Basic Hash Browns

Ingredients:

1 sliced onion

salt and pepper

3-4 cups of McCain’s frozen hash browns (they are the best in my opinion)

Directions:

1. Saute’ sliced onion in about a tablespoon of extra virgin olive oil.

2.  Add salt and pepper to season. (note: if you want to add ham or another meat at this point, go for it!)

3. After about 5 minutes, add the potatoes.  Mix together.  Let it cook about 7 minutes.

4. Using a spatula, flip sections over one at a time until you get a nice golden brown.  If they look a little soft, add a little more olive oil, but you shouldn’t need more than another tablespoon. Serve hot!

And, now, for all the spice lovers out there…

The Ham, Cheese and Jalapeno Hash Browns

Ingredients:

1 small sliced onion

Extra virgin olive oil

salt and pepper

1/8 tsp cayenne pepper

sprinkle of crushed red pepper flakes

1 tsp chili powder

1/2 cup diced cooked ham

1 jalapeno, diced with the seeds lightly removed (If you don’t like a lot of heat, remove all the seeds using a small spoon, not your fingers!!)

3-4 cups of McCain’s frozen hash browns

1/4 cup shredded sharp cheddar cheese

Directions:

1.  Saute sliced onion in about 1 TBSP extra virgin olive oil.

2. Season with salt, pepper, cayenne and chili powder

3.  After about 5 minutes, add the diced ham and jalapenos and cook another 5 minutes.

4. Add 3-4 cups of the frozen potatoes and mix well.

5.  Let cook about 7 minutes and using a spatula, flip over sections one at a time.  You want to get all of the potatoes browned and blended.

6.  Adjust seasoning if necessary (sometimes you might need a little more salt since potatoes absorb it quickly)

7.  Add shredded cheese to the top and serve with a fried egg on top if desired.


McCain
HCJ Hash Browns


Vegetable Quiche

I love Quiche. Love it! I remember my mother making different types of Quiche growing up in the 70s and 80s. We mainly had it for lunch. As a child, ham and cheese Quiche was my favorite along with broccoli and cheese.  I still love cheese.  This recipe is focused more on the vegetables, though you could easily add more cheese. It’s adapted from my mom’s Betty Crocker cookbook. Feel free to play with the measurements once you’ve made it the first time. The Quiche could be served for breakfast or lunch.  Or you could have it as a snack. Or even dinner, I suppose.

You’ll notice that I make it using a mixture of egg whites and whole eggs (my hubby has borderline high cholesterol).  If you prefer to use all eggs, go for it.  This makes 8 decent slices and 6 nice slices. If you’re using it for lunch, I would say cut it into 6 slices.  For breakfast or a snack, I would do the 8 slices and serve with some bread.

Ingredients:

2 whole eggs

2 egg whites

1/2 cup each of diced onion, red pepper, mushrooms, broccoli etc. Whatever veggies you have leftover.

3/4 cup of milk (we use skim, but you could certainly use whatever is in your fridge, including half and half. MMM!)

1/2 teaspoon salt

1/4 teaspoon pepper (I use white pepper sometimes. Just to not have black dots, but the taste is the same)

1/8 teaspoon cayenne pepper (optional)

1/2  cup shredded sharp cheddar cheese (or whatever you like – you might want to add more if it’s a milder cheese)

1 frozen pie crust (thawed according to package – I like Pillsbury)

Directions:

1. Preheat oven to 425.

2.  Spread the crust out in a pie dish.

3. Whisk eggs together with milk.

4. Add vegetables, spices and cheese and mix well.

5.    Pour into pie shell (sometimes I sprinkle a little parmesan cheese before I bake it).

6.  Bake 15 minutes.

7.  Reduce temperature to 300 and bake for about 30 minutes longer (I also cover the sides of the crust at this point so they don’t burn. You can use foil or silicone pie guards (see below)).

8.  When you can put a butter knife in the middle and it comes out clean, it is done.

9. Let stand about 10 minutes.  Cut and serve hot or at room temperature.

HINT#1 – Of course, you could add chopped ham, sausage, bacon or another meat. If so, you might want to cut back on the salt a little.  Just a thought…

Hint #2 – I purchased these pie guards from Current magazine, but am sure you can find them online or in a kitchen store. They are great for any pie. I use them when I  use a frozen pie crust, as the edges tend to burn when baking at high temps (such as when I make apple or pumpkin pies).

Pie Guards 014Pie Guards 013Blog Pics 001

Brie Gowen

Savor the Essence of Life

Drowning in Sufficient Grace

..."My grace is sufficient for you, for power is made perfect in weakness" (2 Corinthians 12:9)

WordPress.com News

The latest news on WordPress.com and the WordPress community.

The Cooking Goose

Cooking and Baking and Blogging, Oh My!

LOVE-the secret ingredient

Like to cook? Like to eat? Be a part of the conversation.

EatWellChef

UNBIASED

The Gourmand Mom

Good food, seasoned with a dash of life